
Image Upscaling: 2x vs 4x vs 8x When You Need to Print Big
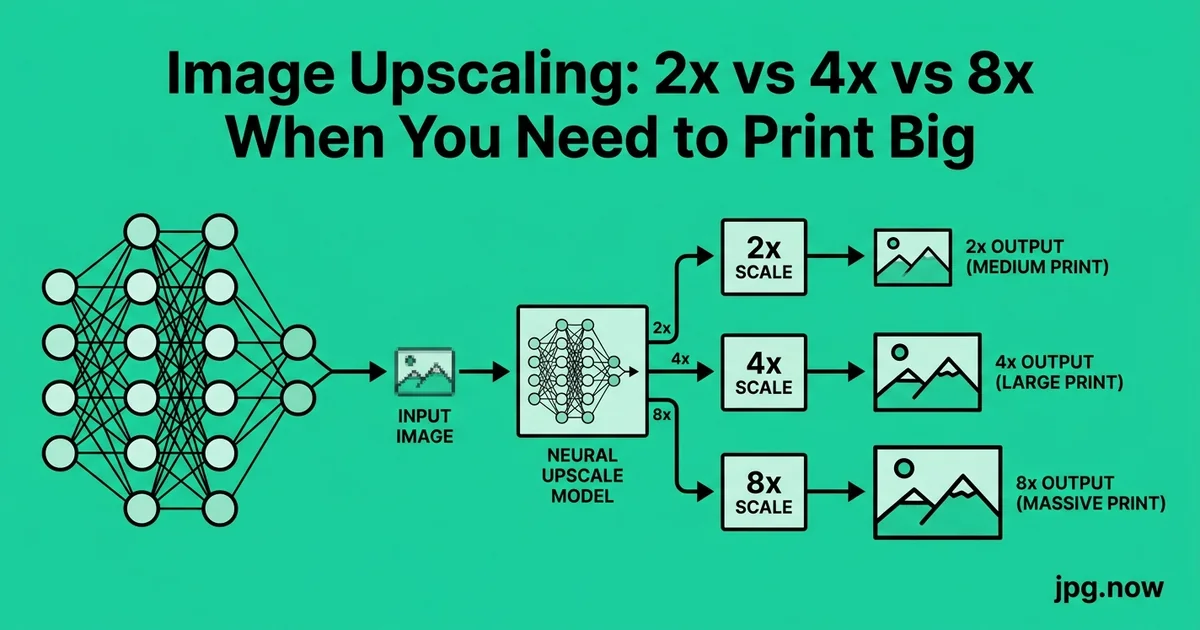
You shot the perfect frame on a 12-megapixel phone in 2018. The client wants it printed at 24x36 for a trade-show booth that opens in 10 days. The math says you do not have enough pixels: 12 megapixels is exactly enough for a 13x10 print at 300 ppi, nowhere close to 24x36. Three years ago, you would have told the client no. In 2026, you upload the file to an AI upscaler, hit 2x, wait two minutes, and have 48 megapixels of clean, print-ready detail. The promise of AI upscaling is huge. Knowing when to trust it is the entire skill.
AI upscaling promises to invent the missing detail, but how much can you really push? Here is the honest assessment of 2x, 4x, and 8x upscaling, the math behind print viewing distance, and what looks fine in print versus on screen. This guide walks through the tool comparison, the format choices that preserve upscaled detail, and the failure modes where upscaling cannot save you regardless of marketing claims.
Background: what AI upscaling actually does
Traditional image enlargement (bicubic, Lanczos, nearest-neighbor) interpolates between existing pixels. The result is blurrier than the source: more pixels but no new detail. AI upscaling uses neural networks trained on millions of high-resolution / low-resolution image pairs. The network learns what fine detail typically looks like at higher resolution and generates plausible detail when given a low-resolution input.
The key word is "plausible." The detail in an AI-upscaled image is not the detail that was actually there. It is the detail that the network's training data suggests should be there. For most photographic content, the difference is imperceptible. For text, repeating patterns, or unusual textures, the difference is obvious.
The pixel math you cannot escape
For a sharp print, you need pixel count divided by inches to land around 240 to 300 ppi for typical photo paper. A 12-megapixel image is 4,000 by 3,000 pixels, enough for a 13x10 inch print at 300 ppi. To go bigger, you need either more pixels (from upscaling) or to lower the ppi target (which works because viewing distance also increases for bigger prints).
At a 24x36 print, 240 ppi requires 5,760 by 8,640 pixels: about 50 megapixels. From 12 megapixels, that is a 2x upscale on each dimension, or 4x in total pixel count. Within reach of modern AI.
At a 48x72 wall display, 150 ppi (acceptable for viewing distance of 4+ feet) requires 7,200 by 10,800 pixels: 78 megapixels. From 12 megapixels, that is a 6.5x dimensional upscale, into the territory where even the best AI starts inventing texture that was never there.
Step-by-step: pushing a source file to print size
- Verify source resolution. Open in the image info tool to get exact pixel dimensions.
- Calculate required upscale. Target print size times target ppi, divided by current pixel dimensions.
- Pre-process for noise and sharpness. Denoise (Topaz DeNoise, Lightroom) and verify the source is sharp at 100% before upscaling.
- Choose multiplier. 2x is safe, 4x is achievable on clean photo subjects, 8x is showroom-only.
- Run AI upscale. Use the AI upscaler for quick jobs, Topaz Photo AI for premium prints.
- Inspect at 100% zoom. Look for "AI smoothing" where natural texture became artificial.
- Save as TIFF master. Use the JPG to TIFF converter to preserve detail without re-compression.
- Send TIFF to print shop. JPG re-compression on top of upscaled detail produces artifacts.
What 2x upscaling actually does
2x upscaling doubles each dimension, quadruples the pixel count. From 12 megapixels you reach 48 megapixels. This is the safest, most reliable tier. Every modern AI upscaler (Topaz Photo AI, Real-ESRGAN, jpg.now's AI upscaler) handles 2x at indistinguishable-from-original quality on most content.
2x is enough to take a 12-megapixel source up to a high-quality 16x24 print or a 4K display crop. Use cases: medium-format prints, large web displays, video grading.
The case for not upscaling at all
Sometimes the right answer is to recompose the print rather than upscale. A 12-megapixel source that does not have enough pixels for a 24x36 print may have plenty for a 16x20 print that is more flattering anyway. Restraint in print size often produces a better-looking final result than maximalist upscaling.
What 4x upscaling actually does
4x quadruples each dimension, 16x the pixel count. From 12 megapixels you reach 192 megapixels: enough for a 32x48 print at 300 ppi. At this level, the AI is doing real interpretation: it is inferring what fine texture "should" look like based on its training data.
4x works well for: clean photographic subjects with predictable texture (skin, sky, foliage, fabric). It fails on: text inside the image, small repeating patterns, low-contrast detail near the noise floor. Examine the output at 100 percent zoom and look for "AI smoothing" where areas of natural texture got replaced with a clean-but-fake gradient.
What 8x upscaling actually does
8x is the showroom number. Most marketing materials advertise it, most production work never needs it. 8x means 64x the pixel count; from 12 megapixels you reach 768 megapixels. Almost no print medium needs that many pixels.
The honest assessment: 8x upscaling produces output that looks impressive at a glance but falls apart under scrutiny. Hair becomes painted-looking. Skin loses pore detail. Fine fabric weave becomes a smooth fill. For billboard-scale display where viewers stand 20+ feet away, 8x can be acceptable. For anything that may be examined up close, stop at 4x.
Multiplier comparison at typical sources
| Source size | 2x output | 4x output | 8x output | Max print at 240 ppi |
|---|---|---|---|---|
| 12 MP (4000x3000) | 48 MP | 192 MP | 768 MP | 2x: 16x24in. 4x: 32x48in. 8x: 64x96in |
| 24 MP (6000x4000) | 96 MP | 384 MP | 1.5 GP | 2x: 25x16in. 4x: 50x33in. 8x: 100x66in |
| 45 MP (8192x5464) | 180 MP | 720 MP | 2.9 GP | 2x: 34x22in. 4x: 68x45in. 8x: 136x91in |
| 100 MP (12000x8000) | 400 MP | 1.6 GP | 6.4 GP | 2x: 50x33in. 4x: 100x66in. 8x: 200x133in |
Combining upscale with crop for print proportions
A 4:3 phone photo printed at 24x36 inches (a 2:3 print ratio) requires either a crop (losing pixels) or a fill (showing white space). The print-aware workflow: crop to 2:3 in your editor first, then upscale the cropped result. This avoids wasting AI processing on pixels you discard.
Use the aspect ratio calculator to map source ratio to destination ratio before upscaling. The 2-minute planning step saves 5 minutes of unnecessary AI processing on larger files.
Tool comparison at 2026
- Topaz Photo AI: Best overall quality, $200 one-time license, slow but produces the cleanest results. Strong on faces and skin.
- Real-ESRGAN: Open-source, free, excellent for general photography and AI-generated source images. Less natural on portraits than Topaz.
- jpg.now AI upscaler: Free, browser-based, 2x and 4x options. Use the AI upscaler for quick jobs that do not justify launching Topaz.
- Adobe Super Resolution: Built into Lightroom, 2x only, fast, integrates with the rest of the Adobe workflow.
- Gigapixel AI: Topaz's older standalone product, still capable, often discounted bundled with Photo AI.
Real-world upscaling examples
Trade-show booth banner. 12-megapixel iPhone shot upscaled 4x for a 36x24 trade-show backdrop. Output: 192 megapixels, printed on backlit fabric at 200 ppi. From 6+ feet away (typical booth viewing distance), indistinguishable from a native high-resolution source.
Wedding album hero spread. Crop from a 24-megapixel wedding photo, upscaled 2x for an 18x24 lay-flat spread. Output: 96 megapixels effective. Critical inspection at the album's print preview pass: zero detectable upscaling artifacts.
Real estate listing hero. 8-megapixel archived listing photo from 2014, upscaled 2x for the property's website. Result: 32 megapixels, used as a hero at 1920px wide. The upscale was overkill for the destination but cheap insurance against future high-DPI displays.
Upscaling for video frame grabs
Video frames at 1080p are 2 megapixels; 4K is 8 megapixels. Pulling a single frame for print or hero use almost always requires upscaling. The challenge: video frames have compression artifacts and slight motion blur that amplify under upscaling. Pre-process with denoise and deblur before the upscale step. Topaz Video AI is purpose-built for this; consumer photo upscalers work but require manual pre-processing.
Print viewing distance changes everything
The rule of thumb: minimum acceptable ppi equals 600 divided by viewing distance in inches. A print viewed from 12 inches needs 50 ppi minimum (often pushed to 300 for safety). A print viewed from 6 feet (72 inches) needs only 8 ppi to look acceptable, though most prints target 100 to 150 ppi for safety.
That means a 4-foot poster viewed from 6 feet away looks fine at 150 ppi, requiring only 7,200 by 10,800 pixels: within 4x upscale range from a modern phone shot. The same poster examined at arm's length needs 240 ppi, requiring almost double the pixels.
Tile-based upscaling for very large files
Some upscalers struggle on inputs over 100 megapixels due to GPU memory limits. The fix: split the source into overlapping tiles, upscale each tile separately, recompose. Topaz Photo AI handles this automatically. Real-ESRGAN has a tile parameter. The output should be visually seamless; check tile boundaries at 100% zoom for any visible artifacts.
The format choice for upscaled prints
After upscaling, save the master as TIFF. Upscaled output is large: a 192-megapixel TIFF is 500 MB; but JPG compression on top of AI-invented detail produces noticeable artifacts. Send the TIFF to the print shop. Use the JPG to TIFF converter to handle the conversion if your upscaler outputs JPG natively.
For online proofing, generate a JPG variant. Quality 90 at the same dimensions still produces a 30 to 60 MB file, enough for the proof but not the final print.
Where upscaling cannot save you
Severely out-of-focus source images. Heavy motion blur. Aggressive JPG compression artifacts (8x8 blocks visible in skies). Heavy noise from a high-ISO shot. AI upscalers can clean some of these, but the cleaning is itself a fabrication. The detail that would have been there is gone, and the AI is guessing what should fill the void.
If the source has a fundamental quality problem, address it first: denoise, deblur, dejpeg, then upscale. Topaz Photo AI integrates these as separate modules and runs them in the right order.
Common upscaling mistakes
- Upscaling JPG-artifacted sources without dejpeg first. The AI faithfully enlarges the artifacts.
- 8x for everything because "more is better." Stop at the resolution your destination actually needs.
- Re-compressing as JPG after upscale. Wastes the AI-invented detail. TIFF master only.
- Not checking at 100% zoom. Web thumbnail looks fine; print or 4K display reveals the smoothing.
- Upscaling text-heavy images. AI struggles with text edges. Re-create the text in vector if possible.
- Skipping denoise on high-ISO sources. Noise gets amplified into permanent texture.
Advanced upscaling tips
- Denoise before upscale, sharpen after. The order matters; reversed order produces noisier output.
- Pick the right model for the source. Topaz Photo AI offers "High Fidelity" for general photo, "Faces" for portraits, "Lines" for graphics.
- Upscale in steps for extreme cases. 12 MP through 2x, then again through 2x produces 4x output that may look cleaner than direct 4x in some tools.
- Test on a 100-pixel crop first. A small test takes seconds; a full 4x upscale of a 100 MP file takes 10 minutes.
- Combine with the DPI converter to embed correct print metadata. Some print shop software respects embedded ppi.
- Profile your printer. If you know your inkjet effectively prints at 240 ppi, do not upscale to 480 ppi.
- Use the aspect ratio calculator for crop planning before upscale. Crop to final aspect ratio first, then upscale, to avoid wasting AI work on pixels you crop away.
FAQ
Is 4x AI upscaling really print-ready?
For most photographic subjects, yes, at typical viewing distances. For close inspection (album spreads, portfolio prints), 2x is safer and 4x requires careful inspection. For billboard-distance viewing, 4x is more than enough.
Can I upscale a screenshot for print?
Marginally. Screenshots have hard text edges that AI upscalers handle imperfectly. Better to re-render the source at higher resolution if possible.
Does upscaling work on phone photos?
Yes, modern phone photos are clean enough for 2x to 4x upscaling. Avoid upscaling Night Mode or low-light shots without denoising first.
How long does AI upscaling take?
Web tools: 30 seconds to 2 minutes for 2x on a typical 12 MP source. Desktop tools (Topaz): 30 seconds to 3 minutes depending on GPU. Server-grade: parallelizable for batch jobs.
Is there a quality difference between Topaz and free tools?
Yes, on hard cases (low light, motion blur, complex texture). On clean photographic input, free tools are within 5-10% of Topaz quality, and the jpg.now AI upscaler is genuinely competitive.
What about video upscaling?
Different toolchain: Topaz Video AI, DaVinci Resolve. Same principles apply: clean source, conservative multiplier, output to professional format.
Can I batch upscale 1,000 images?
Yes. Topaz Photo AI supports batch processing. Real-ESRGAN command-line runs batches via shell scripts. Plan for 1-3 hours per 1,000 images depending on hardware.
A test workflow
Pick a 12-megapixel source from your archive. Generate three variants: 2x, 4x, and 8x using the AI upscaler or your preferred tool. Compare at 100 percent zoom on a calibrated monitor. Print all three at the largest size your printer supports. Note where each variant starts to fall apart. The exercise teaches you exactly where your upscaling ceiling is for your typical content.
Upscaling AI-generated source images
AI generators output 1024-2048px squares. For hero placement on a desktop hero slot (3840px wide), you need 2x-4x upscale. AI-on-AI upscaling works surprisingly well because the source already has clean edges and predictable texture. The AI upscaler at 4x turns a 1024px Midjourney output into a 4096px print-ready file in under 2 minutes.
The denoise-deblur-upscale order
Multiple corrections in sequence have a correct order. Noise removal first (otherwise upscale amplifies noise into permanent texture). Motion blur correction next. Sharpening last (after upscale, sharpening operates on clean detail rather than amplified noise). Topaz Photo AI runs these in the right order automatically. Custom pipelines should follow the same sequence.
Print viewing distance and the "good enough" point
Most home prints land in the 8x10 to 16x20 range and get viewed from 2-6 feet. At those ranges, the math is forgiving. A 12-megapixel source upscaled 2x prints at 16x20 at 200 ppi, which is sharp at 2 feet and indistinguishable from native high-resolution at 6 feet. The mistake is thinking you need 300 ppi for every print; you need 300 ppi for prints viewed at 12 inches, less for everything else.
Build a production-grade upscale pipeline
For repeated client work, the pipeline is: source JPG, denoise if needed, 2x or 4x upscale, TIFF export for print. Drop the source through the AI upscaler to verify quality at the chosen multiplier, convert to TIFF master using the JPG to TIFF converter, and archive. The next time a client asks for "as big as you can go," you have an answer with numbers behind it rather than a guess. Pair the workflow with the DPI converter for print metadata and the image info tool for dimension verification before sending to print. For aspect-ratio planning before crop and upscale, the aspect ratio calculator avoids wasted pixels. See the tools directory for the complete upscaling kit.